Settings
The Settings page lets you personalise how SmoovOps looks and behaves for you.
Opening Settings
Click your name or the user icon in the top bar, then choose Settings from the dropdown menu. Choosing Activity Log from the same menu takes you straight to the Activity tab (see Viewing your activity log below).
Page layout
Settings has four tabs: General, Company, Billing, and Activity.
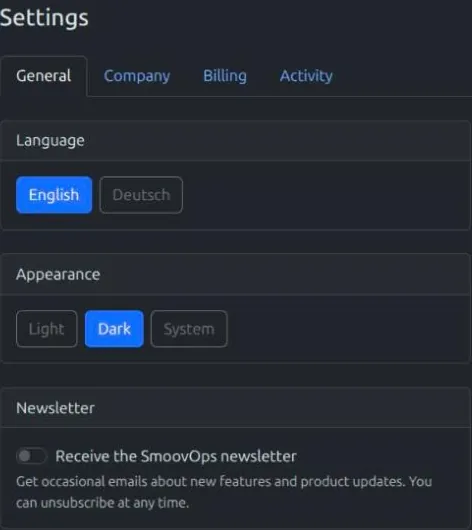
- General — Language, Appearance, and Newsletter. Visible to everyone, on any plan and any role.
- Company — your Company Profile, your company Addresses, your company Bank Accounts, Reminder Emails, Invoice and offer pricing, Regional Settings, Payment Accounting Terms, Tax Rates, and (Starter/Pro) API Tokens. Only visible to the account Owner or an Admin — a regular User doesn't see this tab at all.
- Billing — your Plan (including your billing status), Payment Method, and Team. Also only visible to the account Owner or an Admin; a regular User doesn't see this tab either. Some sections within it have their own narrower visibility rules on top of that — see each section below.
- Activity shows a log of actions taken on your account — see Viewing your activity log below. Visible to everyone, but what you see inside it still depends on your role.
The Receipt Budgets section (see Turning budget tracking on or off) only appears on the Company tab at all for accounts where it applies — see that section for the exact conditions.
Display language
SmoovOps is available in English and Deutsch. To change the language:
- Go to Settings.
- Under Language, select the language you prefer.
- The page reloads and the entire interface switches to the selected language.
The language setting is stored in your session. If you use SmoovOps on multiple devices or browsers, you may need to set the language on each one.
Light and dark mode
SmoovOps supports three appearance options: Light, Dark, and System — where System follows your device's own light/dark setting and switches automatically if you change it. The dark theme is easier on the eyes in low-light environments.
From Settings:
- Go to Settings.
- Under Appearance, select Light, Dark, or System.
- The interface updates immediately.
From anywhere: click the sun/moon/half-circle icon in the top navigation bar to cycle through System → Light → Dark and back to System, without opening Settings. Whichever option you pick — from Settings or the navbar icon — is remembered for next time.
Newsletter
The Newsletter section, on the General tab of the Settings page below Appearance, lets you opt in to occasional emails from SmoovOps about new features and product updates. It's off by default — you have to actively switch it on to receive anything.
To subscribe or unsubscribe:
- Go to Settings, under the General tab, then Newsletter.
- Switch Receive the SmoovOps newsletter on or off.
- Changes save automatically — no separate Save button.
This is a personal preference, not a company-wide one — every team member decides for themselves, regardless of role.
Managing your plan
The Plan section, on the Billing tab of the Settings page, shows your current plan.
- If you are the account Owner, the Plan section is always visible — including on the free Free plan.
- If you are an Admin, the Plan section is only visible once the account is on a paid plan (Starter or Pro) — it's hidden while the account is still on the free plan.
- A regular User does not see the Plan section, or the Billing tab, at all.
- Go to Settings, under the Billing tab.
- Under Plan, your current plan and account type are shown.
- If a higher plan is available for your account type, an Upgrade button appears. Select it, then confirm — the upgrade takes effect immediately.
- If you're already on the highest plan for your account type, no upgrade button is shown.
Upgrades move you one step up:
- Free Free → Starter Starter+
- Starter Starter+ → Pro Pro
Downgrading to a lower plan isn't available from Settings — contact the SmoovOps support team if you need this.
To compare what each plan includes before upgrading, visit the Pricing page.
On a paid plan, the Plan section also shows your billing status — the same status SmoovOps staff see when deciding whether to charge your account: Current, Due, Overdue, or Payment failed (with the failure reason, if any), alongside your next payment due date and, once you've been charged at least once, the date of your last payment. This isn't shown on the Free plan, or once a contract has been cancelled — neither has anything due.
Add-on: Startup Insights
On a paid plan (Starter or Pro), the Plan section also shows a checkbox for the Startup Insights add-on — €7/month, billed per account (not per team member), on top of your plan price. Turning it on or off takes effect immediately, and the displayed total price updates right away to include (or drop) the €7. It's not available on the Free plan or once a contract has been cancelled.
- Go to Settings, under the Billing tab, then Plan.
- Check or uncheck Add-on: Startup Insights.
Both the account Owner and an Admin can subscribe or unsubscribe — the same roles that can already see the Plan section. Subscribing enables the Startup Metrics page; unsubscribing disables it again.
Add-on: Marketing/Sales Funnel
On a paid plan (Starter or Pro), the Plan section also shows a checkbox for the Marketing/Sales Funnel add-on — €9/month, billed per account (not per team member), on top of your plan price. Turning it on or off takes effect immediately, and the displayed total price updates right away to include (or drop) the €9. It's not available on the Free plan or once a contract has been cancelled.
- Go to Settings, under the Billing tab, then Plan.
- Check or uncheck Add-on: Marketing/Sales Funnel.
Both the account Owner and an Admin can subscribe or unsubscribe — the same roles that can already see the Plan section. Subscribing enables the Leads page; unsubscribing disables it again. This add-on is independent of Startup Insights above — subscribing to one never requires or affects the other.
Quitting your contract
The account Owner — on any plan, Free, Starter, or Pro — can end the contract immediately from the Plan section. An Admin or a regular User never sees this option, on any plan.
- Go to Settings, under the Billing tab, then Plan.
- Select Quit Contract.
- Confirm — this takes effect immediately.
This is permanent. Once confirmed, the contract cannot be reactivated, upgraded, or changed from Settings again — the Plan section instead shows a notice that the contract has been cancelled. If you cancel by mistake, contact the SmoovOps support team.
Default payment method
The Payment Method section, on the Billing tab of the Settings page directly below Plan, stores the card or bank account SmoovOps charges for your subscription. Unlike Plan, it's visible to the account Owner and Admin on any plan, including the free Free plan. A regular User does not see it, or the Billing tab, at all.
- If no payment method is on file, the section says so, next to an Add payment method button.
- Once one is saved, its summary is shown instead — a card's brand and last 4 digits, or a bank account's last 4 digits for SEPA direct debit — next to an Update payment method button and a Remove button.
To add or update your payment method:
- Go to Settings, under the Billing tab, then Payment Method.
- Select Add payment method (or Update payment method if one is already on file).
- Enter your card or bank account details in the form that appears, and click Save.
Your card or bank account details are entered directly with Stripe, SmoovOps's payment processor — they never reach SmoovOps's own servers; only the resulting payment method is linked to your account.
To remove your payment method: click Remove, then confirm.
If Stripe isn't yet configured for your environment, a notice appears here instead of the form.
Managing your company profile
The Company Profile section, at the top of the Company tab of the Settings page, stores your business's legal identity — used as the sender details on documents you generate from a template. This is only visible to the account Owner.
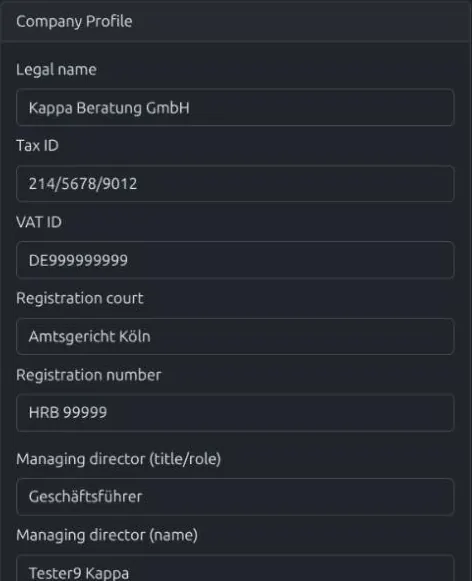
To set your company profile:
- Go to Settings, under the Company tab.
- Under Company Profile, fill in your Legal name (required), and any of Tax ID, VAT ID, Registration court, Registration number, Managing director (its title/role, and separately its name), Website, and Logo that apply to your business.
- Click Save.
Your legal name, tax details, registration court and number, managing director, logo, and website appear on generated documents alongside your Main address (see Managing your company address below) — including that address's contact name, email, phone, and country, not just its street and city. Generating a Letter, Offer, or Invoice requires at least a Legal name to be saved here first; see Generating a document from a template.
Website is a link to your business's own website, stored alongside your legal details. Logo lets you upload an image of your company logo — unlike a partner's logo, it's kept exactly as uploaded, without any resizing, since it may be reused at full resolution in document templates.
Managing director is two separate fields: a title or role (SmoovOps suggests "Geschäftsführer o.ä." as a starting point, but you can replace it with whatever fits your business — "Inhaber" for a sole proprietorship, for example) and the person's name. Both are shown together on generated documents; leaving the title empty hides this line entirely, even if a name is filled in.
Managing your company address
The Addresses section, on the Company tab of the Settings page directly below Company Profile, stores your own company's addresses — for example your business address and a separate billing address — rather than a partner's. This is only visible to the account Owner.
To add an address:
- Go to Settings, under the Company tab.
- Under Addresses, click Add Address.
- Choose the Usage (Main, Billing, Shipping, or Other), fill in the contact person, email, phone, and postal address fields you need, and click Save.
You can add as many addresses as you need, and edit or remove any of them at any time using the pencil or trash icon next to it.
Managing your company bank accounts
The Bank Accounts section, on the Company tab of the Settings page directly below Addresses, stores up to two of your business's bank accounts — shown on generated Letters, Offers, and Invoices so recipients know where to send payment. This is only visible to the account Owner.
To add a bank account:
- Go to Settings, under the Company tab.
- Under Bank Accounts, click Add Bank Account.
- Fill in the Bank name, IBAN, and BIC/SWIFT, then click Save.
You can edit or remove a saved account at any time using the pencil or trash icon next to it. Once two accounts are saved, Add Bank Account is replaced by a note that up to two can be added — remove one first if you need to add a different one.
Managing your team Free
Every plan, including Free, lets more than one person use the same SmoovOps account. The Team section, on the Billing tab of the Settings page, lets you invite additional users and see who's on your team. How many team members you can have depends on your plan:
| Plan | Team members (including you) |
|---|---|
| Free | 2 |
| Starter | 5, billed per additional user |
| Pro | Unlimited, billed per additional user |
Once you reach your plan's limit, the Team section shows how many seats you've used and you'll need to upgrade to invite more people.
The Team section is visible to the account Owner or an Admin — on any plan.
Roles
- Owner — the person who originally registered the account. There is exactly one owner per account, and this role can't be reassigned from Settings.
- Admin — can invite additional users, same as the owner.
- User — a regular team member. Can't invite anyone and doesn't see the Team section.
Inviting a user
- Go to Settings, under the Billing tab.
- Under Team, you'll see a list of everyone already on your account, with their role and status (Pending until they've confirmed their email and set a password, Active afterwards).
- Fill in the new user's name and email address, choose whether they should be an Admin or a User, then select Invite user.
- The new user receives an email with a confirmation code and a link. Once they open the link, confirm the code, and choose their own password, their status changes to Active and they can log in.
You don't set a password for the people you invite — each person chooses their own when they confirm their invitation.
Changing a team member's role
The account Owner or an Admin can change any other Admin or User between those two roles at any time — the Owner's own role can never be changed from here, and you can't change your own role either.
- Go to Settings, under the Billing tab, then Team.
- Next to the person whose role you want to change, use the Role dropdown to select Admin or User.
The change takes effect immediately — no separate save step or confirmation needed.
Removing a team member
The account Owner or an Admin can remove any Admin or User from the team — the Owner's own row can never be removed, and you can't remove yourself.
- Go to Settings, under the Billing tab, then Team.
- Next to the person you want to remove, select Remove.
- Select Confirm to finish, or Cancel to back out.
Removing someone takes effect immediately for signing in again: they disappear from the Team list, free up a seat for a new invite, and any new login attempt is rejected right away. If they were already signed in at the time, though, their current session can keep working for up to about an hour afterward — sign-in sessions are valid for an hour and aren't individually cut short, so a removal doesn't force out a session that's already active. This can't be undone from Settings — contact the SmoovOps support team if you need to restore a removed team member.
Forgot password
If you or someone on your team forgets their password, select Forgot password? on the login screen. Enter the email address to receive a reset code, then use that code to choose a new password.
Turning budget tracking on or off Pro
The Receipt Budgets section, on the Company tab of the Settings page, lets a Pro account turn the budget-tracking feature off for the whole team — for example if uncontrolled variable-spend tracking doesn't fit your organization's expense-approval process.
The Receipt Budgets section is only visible if both of these are true:
- Your account is on the Pro plan, and
- You are the Owner or an Admin on the account.
Budget tracking is a Pro-only feature — Free and Starter accounts don't have it available, so there's nothing to suppress on those plans.
To turn budget tracking off:
- Go to Settings, under the Company tab.
- Under Receipt Budgets, switch on Suppress receipt budgets for this account.
- This takes effect immediately for every member of your team — the Shopping receipt switch on the Reconcile page disappears for everyone, and only the bank-statement upload area remains.
Switch it back off at any time to restore the feature for your team. Turning it off doesn't delete any budget categories or previously logged receipts — they're simply hidden from view until you turn it back on.
Reminder emails
Every contract with an end date or a renewal automatically gets a reminder — see Automatic reminders and payments. The Reminder Emails section, on the Company tab of the Settings page below Addresses, lets you control where those reminder emails are sent. It's visible to the account Owner or an Admin, on any plan.
Default reminder email address — the address every contract's reminder emails go to, unless that contract overrides it (see below). Leave it blank and reminders go to every team member instead.
Allow team members to override reminder emails per contract — when this switch is on, anyone on the team (not just owners/admins) can change where a specific contract's reminders go, or turn them off for that one contract, from the contract's own Advanced options. When it's off, only an owner or admin can change this per contract.
To set it up:
- Go to Settings, under the Company tab, then Reminder Emails.
- Enter a Default reminder email address, and/or switch on Allow team members to override reminder emails per contract.
- Changes save automatically — no separate Save button.
The yellow reminder bell in the navigation bar always shows upcoming reminders to everyone on the team, regardless of who the reminder emails are actually sent to.
Invoice and offer pricing
The Invoice & Offer Pricing section, on the Company tab of the Settings page below Reminder Emails, controls who can change line-item pricing when generating a document — see Overriding line-item pricing. It's visible to the account Owner or an Admin, on any plan.
Allow team members to override line-item pricing — when this switch is on, anyone on the team (not just owners/admins) can change a line item's unit price, and edit the line items copied over when generating an Invoice from an Offer. When it's off, only an owner or admin can do either of those; everyone else sees the catalogue price and the copied-over line items, but can't change them.
To set it up:
- Go to Settings, under the Company tab, then Invoice & Offer Pricing.
- Switch on Allow team members to override line-item pricing.
- Changes save automatically — no separate Save button.
Regional Settings
The Regional Settings section, on the Company tab of the Settings page below Invoice & Offer Pricing, controls how dates, numbers, and currency amounts are displayed for your whole team. It's visible to the account Owner or an Admin, on any plan.
- Date format — choose
DD.MM.YYYY,DD/MM/YYYY, orYYYY-MM-DD. Each option in the dropdown shows a formatted example date so you can preview the pattern before choosing. - Number format — choose
1.234,56(dot for thousands, comma for decimals) or1,234.56(comma for thousands, dot for decimals). - Currency — choose from EUR, GBP, CHF, SEK, DKK, NOK, PLN, CZK, HUF, RON, BGN, or ISK.
To change it:
- Go to Settings, under the Company tab, then Regional Settings.
- Pick a value from any of the three dropdowns.
- Changes save automatically — no separate Save button.
By default, new accounts use DD.MM.YYYY, 1.234,56, and EUR.
Your date and number format apply everywhere dates and amounts are shown — Payments, Products, Contracts, Notes, Documents, generated Offers and Invoices, the Dashboard, and account activity/API token timestamps. A record's own currency (for example a payment or product saved in USD) is always shown alongside its amount as-is; the Regional Settings currency only sets the default for newly created records and the Dashboard's aggregate figures.
Payment Accounting Terms
The Payment Accounting Terms section, on the Company tab of the Settings page below Regional Settings, controls which German bookkeeping term — SOLL or HABEN — is shown next to a payment's amount on the Payments list, grid, and detail views, for your whole team. It's visible to the account Owner or an Admin, on any plan.
Only one dropdown, Incoming payments, needs setting — the term for outgoing payments always follows automatically as the other one of the pair:
- Incoming = HABEN, Outgoing = SOLL — the default. Treats a customer's payment as crediting (HABEN) their debtor account, and a payment to a vendor as debiting (SOLL) the creditor account.
- Incoming = SOLL, Outgoing = HABEN — the opposite convention, treating an incoming payment as a debit (SOLL) to your bank/cash account and an outgoing one as a credit (HABEN) to it.
Both are valid bookkeeping conventions depending on which account's perspective you're booking from — pick whichever matches how your own books are kept.
To change it:
- Go to Settings, under the Company tab, then Payment Accounting Terms.
- Pick a value from the Incoming payments dropdown.
- Changes save automatically — no separate Save button.
Tax Rates
The Tax Rates section, on the Company tab of the Settings page below Invoice & Offer Pricing, is where you maintain the named tax rates your account can assign to a product's Tax Rate field — see Adding a product. It's visible to the account Owner or an Admin, on any plan.
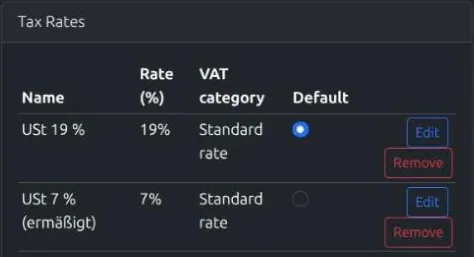
Each tax rate has a Name (for example "Standard" or "Reduced"), a Rate (%) between 0 and 100, and can be marked Default — new products default their Tax Rate field to whichever tax rate is marked default; existing products keep whatever they already have. Only one tax rate can be default at a time — marking a different one default un-marks the previous one automatically.
To manage your tax rates:
- Go to Settings, under the Company tab, then Tax Rates.
- Under Add Tax Rate, enter a Name and a Rate (%), optionally check Default, and click Add.
- To change a rate afterwards, click Edit on its row, adjust the fields, and click Save.
- To make a different rate the default, select its radio button in the Default column.
- To remove a rate you no longer need, click Remove, then Confirm.
A product's Tax Rate automatically applies to every line item using that product when generating an Offer or Invoice (see Generating a document from a template) — there's nothing to set by hand per document. If your lines mix rates, the generated document shows a separate subtotal for each rate used.
API Tokens Starter+
The API Tokens section, on the Company tab of the Settings page below Tax Rates, is where you generate credentials for calling the SmoovOps API directly — from your own scripts, a CI pipeline, or a tool like Zapier — without a browser session. See API Access for the full guide to using a token once you have one. It's visible to the account Owner or an Admin, on the Starter or Pro plan — not available on Free.
To generate a token:
- Go to Settings, under the Company tab, then API Tokens.
- Select Generate new token.
- Give it a name — something that reminds you what it's for, e.g. "CI pipeline" or "Zapier" — and optionally an expiry date, then select Generate.
- A dialog shows your new token and your account's API key, exactly once. Copy both now — SmoovOps never shows the full token again after this.
Every token you generate reuses the same account-wide API key — only the token itself is unique per integration.
To revoke a token:
- Go to Settings, under the Company tab, then API Tokens.
- Next to the token you want to revoke, select Revoke, then Confirm.
Revoking is permanent — if you revoke a token by mistake, generate a new one. A revoked token stops working within a few minutes, though not necessarily instantly everywhere.
Viewing your activity log
The Activity tab on the Settings page shows a log of actions taken on your account — for example signing in, inviting a team member, or creating and updating contracts, partners, and payments. Entries are listed with the newest action first.
To view it:
- Go to Settings and select the Activity tab, or choose Activity Log directly from the user menu in the top bar.
- Browse the list, newest activity at the top.
How far back you can see
How much history is available depends on your plan:
| Plan | Activity history shown |
|---|---|
| Free | Last 30 days |
| Starter | Last 180 days |
| Pro | Last 180 days |
Upgrading from Free to Starter immediately extends how far back you can see — no waiting period, since the activity was always being recorded, just not previously shown that far back.
Whose activity you see
- The account Owner and any Admin see activity from everyone on the account by default.
- A regular User only ever sees their own activity.
- On any plan — Free, Starter, or Pro — an Owner or Admin can narrow the list to one specific person using the Filter by user dropdown next to the search box — choose All activities to see everyone again.
Searching and loading more
Use the search box to narrow the currently displayed entries by action, person, or the item they affected. Search only looks through activity that's already been loaded on the page — if you're looking for something further back in time, select Load more first, then search.
Use the Show dropdown to choose how many entries load at a time (10, 25, or 50). If there's older activity beyond what's currently shown, a Load more button appears below the list; selecting it adds the next batch to what's already displayed.