Payments
The Payments module lets you record and track every payment connected to your contracts — whether it has been received, is still pending, or needs following up.
How payments relate to contracts
Each payment is linked to a contract (which brings its partner along automatically). You can optionally add a document number for your own reference. Recording payments against a contract lets you see at a glance what has been settled and what is still outstanding.
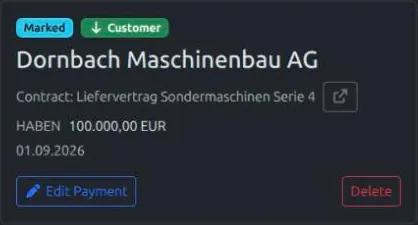
Payment statuses
| Status | Meaning |
|---|---|
| Pending | The payment has been initiated or is expected but not yet confirmed. |
| Marked | You've confirmed this payment happened — manually or via a bank statement match — but haven't finalised it yet. See Reconciling payments below. |
| Succeeded | The payment has been received and confirmed. |
| Failed | The payment attempt did not go through. |
| Refunded | The payment was returned to the partner. |
Payment methods
When recording a payment, select the method that was used:
- Bank Transfer — direct bank-to-bank payment
- Credit Card — card payment
- Direct Debit — automatic deduction from the partner's account
- Other — any method not listed above
Recording a payment
- Go to Payments in the left sidebar and click Add payment.
- Use the contract picker to search for and select the Contract this payment applies to. This fills in the linked partner automatically; use Change if you picked the wrong one. The picker shows your most recently updated contracts by default, so the common case needs no typing at all.
- Optionally enter a Document Number for your own reference.
- Set the Status (usually Succeeded for a payment that has arrived).
- Choose the Payment method.
- Enter the Amount, Currency, and Payment Date.
- Click Save.
If the payment is for a supplier invoice you received as a ZUGFeRD e-invoice, its exact amount, date, and reference are already visible on the reviewed document — see E-invoices (ZUGFeRD) — though recording the payment itself is still this manual step.
Notes and reminders
Open a payment's detail view to see its linked contract, with the same jump-to-linked-record icon used elsewhere in SmoovOps (for example on the Notes page) to go straight to that contract's own detail page. From here you can also attach your own notes and reminders to the payment — for example a note about how it was settled, or a personal reminder to follow up with the partner. See the Notes & Reminders page for how these work, including the Notes page that lists everything across all your partners, contracts, and payments in one place.
This is separate from the automatic reminder emails described below, which are triggered by a contract's own settings — the notes and reminders here are entirely up to you.
Recurring payments
If a contract has a Billing cycle set under its Advanced options (see the Contracts page), you don't need to create every period's payment by hand: once you mark the current payment Succeeded, SmoovOps automatically creates the next one — due date advanced by one billing cycle (Monthly, Quarterly, or Yearly), same amount — for as long as the contract stays Active. Every contract also automatically gets one initial payment for its total value the moment it becomes Active, whether or not a billing cycle is set.
Automatic email reminders
SmoovOps can email you before a payment falls due, so you don't have to check the app every day to avoid missing one. The lead time comes from the linked contract's Notice period (Advanced options), or 3 days if the contract doesn't set one. Once a contract is no longer Active, its payments stop generating reminder emails, even if a payment is still open.
This is separate from the notes and reminders above — those are private entries you create yourself and are never emailed to anyone; this is SmoovOps proactively notifying you about payments it already knows are coming up.
AI-assisted payment data collection Pro
On the Pro plan, SmoovOps can read payment confirmation documents or emails and pre-fill the payment details for you automatically. Instead of typing in the amount, date, and reference manually, you provide the confirmation and SmoovOps extracts the relevant information and creates a draft payment record. You review and confirm before it is saved.
Viewing and filtering payments
Go to Payments in the left sidebar to see the full list. Each row shows the linked contract, the partner name, the payment date, the method, the amount, and the status.
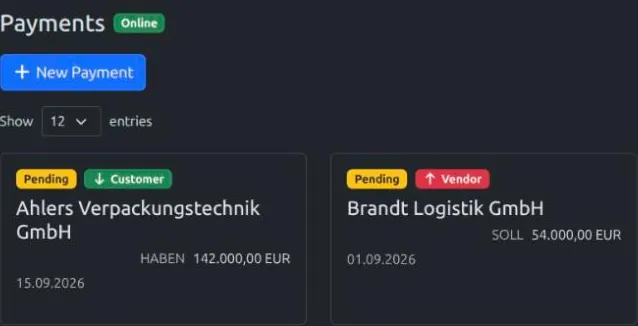
Use the toggle above the list to switch between Grid and List view — your choice is remembered the next time you visit the page. In List view, click a column header to sort by that column; click it again to reverse the order. Use the 1 month, 3 months, or 6 months buttons to widen or narrow the list to payments due in that period — your choice is remembered too, including after you edit, delete, or otherwise navigate away from and back to the list. Use the search box to filter by partner name or contract name, and use the status filter to see only pending, succeeded, or failed payments.
Next to each amount, a small SOLL or HABEN label shows which side of the books that payment falls on — see Payment Accounting Terms on the Settings page to change which term applies to incoming vs. outgoing payments for your whole team. The Customer/Vendor badge next to the partner name shows the same incoming/outgoing direction, based on whether the linked contract's partner is a customer or a vendor.
Reconciling payments
Instead of opening every payment individually to mark it Succeeded, use Reconcile to work through everything due in a period at once. Every plan, including Free, can do this by hand — see Marking payments as paid manually below. On the Pro plan, SmoovOps can additionally do the matching for you against an uploaded bank statement, described next.
Bank statement or shopping receipt? Pro
At the top of the Reconcile screen, a switch lets you choose between Bank statement and Shopping receipt — only one is shown at a time. Use Bank statement to reconcile payments against your actual bank activity, described below. Use Shopping receipt to log variable spending (groceries, fuel, and similar) against a monthly budget instead — see Tracking budgets from shopping receipts further down. Switching between the two doesn't lose your place in either — an in-progress bank statement review or an uploaded receipt waiting for review is still there when you switch back.
Both of these use AI-assisted data extraction, so the switch — and everything below it on this page — only appears on the Pro plan; a Pro account can also turn the Shopping receipt side off entirely, see Tracking budgets from shopping receipts. On the Free and Starter plans, the Reconcile screen shows only the manual list described in Marking payments as paid manually.
Reconciling against a bank statement Pro
If you'd rather match payments against your actual bank activity than mark them one by one, upload your bank statement and let SmoovOps do the matching for you.
- Go to Payments in the left sidebar and click Reconcile. Select Bank statement in the switch at the top of the screen if it isn't already selected.
- Check or uncheck Automatically mark high-confidence matches as paid to your liking — see Automatic matching confidence below. Your choice is remembered for next time.
- Drag and drop your bank statement onto the upload area, or click Choose File to browse.
- SmoovOps reads every transaction in the statement and compares it against the payments due in the period you uploaded it for — matching on the exact amount and currency, then scoring how closely the counterparty name and reference text line up with the payment's partner and contract.
Only one bank statement can be reviewed at a time. If you try to upload a new one while another is still in progress, you'll see a banner linking back to the one that's already open instead of the upload area.
Automatic matching confidence Pro
- High-confidence match, with automatic approval switched on — the matched payment is staged Marked without any action from you.
- A match was found, but confidence is lower — or automatic approval is switched off — the transaction is listed on the review screen for you to decide.
- No matching payment found — shown as "No match found". This is informational only and never blocks finishing the review.
Reviewing matched transactions Pro
The review screen lists every transaction from the uploaded statement, showing its amount, counterparty, reference, and value date alongside the payment it was matched to (if any) and a match score.
- Click Accept to confirm a suggested match — this stages the payment Marked, the same as an automatic match would.
- Click Reject if the suggestion is wrong — the payment is left untouched at its current status.
- Leaving a transaction unresolved is fine; it just stays informational. Once you're done, click Done reviewing to finish — this frees up the slot so you can upload the next statement.
- If you uploaded the wrong file, click Discard instead of reviewing it, then confirm — this removes the statement without touching any payment it may have already matched.
Unmatched transactions report Pro
If any transaction in the statement doesn't match a payment due that period, the review screen shows a banner above the transaction list telling you how many. These are charges on your bank statement that SmoovOps can't account for against anything currently due — worth a look before you finish reviewing.
- Click View as PDF to open the list (date, amount, receiver, and reference for each transaction) in a new tab and print or save it.
- Click Download CSV to get the same list as a CSV file instead.
The banner only appears while there's at least one such transaction, and only lists transactions from the statement you're currently reviewing.
Marking payments as paid manually
Below the bank statement area, the Reconcile screen also lists every payment due in the period currently selected on the main list (1, 3, or 6 months).
- Tap a Pending payment to stage it Marked — tap it again to undo. Payments already Succeeded, Failed, or Refunded aren't affected here; correct those from the payment's own edit form instead.
- Check Hide paid to temporarily remove already-Succeeded payments from the list while you work — this only changes what's shown, not their status.
- Once everything you've confirmed is staged, click Confirm marked payments to promote all of them to Succeeded in one step.
Whichever way a payment ends up Marked — manually or via a bank statement — Confirm marked payments is what promotes it to Succeeded.
Tracking budgets from shopping receipts Pro
Not every expense is tied to a fixed contract and payment — groceries, fuel, and similar variable spending don't fit the Payments model above. For these, set a monthly budget per category and log your receipts against it: uploading a receipt doesn't mark anything "paid", it simply deducts the receipt's amount from that category's remaining budget for the current calendar month.
This uses the same AI-assisted data extraction as bank statement reconciliation above, so it's available on the Pro plan only — it isn't available on the Free or Starter plans. The account owner or an admin can also switch it off entirely for the whole team — see Turning budget tracking on or off on the Settings page.
Setting up budget categories
Before logging any receipts, define at least one category to log them against.
- Go to Payments, click Reconcile, select Shopping receipt in the switch at the top, then click Manage budgets.
- Click Add category and give it a Name (for example "Groceries"), a Monthly limit, a Currency, and a few Keywords — words you'd expect to see in the vendor name on a receipt for this category (for example "rewe, edeka, supermarket"). These keywords are what SmoovOps uses to suggest a category automatically when you upload a receipt.
- Click Save. Repeat for each category you want to track.
Each category shows how much of its monthly limit remains, based on the receipts logged against it so far this calendar month. Use the Active toggle to hide a category from the upload flow without losing its history, and the edit or delete icons to change or remove a category entirely.
Uploading a receipt
- Go to Payments, click Reconcile, and select Shopping receipt in the switch at the top of the screen.
- Check or uncheck Automatically log high-confidence category matches to your liking — see Automatic matching confidence above; the same idea applies here, just for categories instead of payments. Your choice is remembered for next time.
- Drag and drop your receipt onto the upload area, or click Choose File(s) to browse — you can upload more than one receipt at once.
- SmoovOps extracts the amount, date, and vendor from each receipt and suggests the best-matching budget category based on your keywords.
Unlike bank statements, there's no single-review-at-a-time limit here — upload as many receipts as you like, whenever you like.
Reviewing a receipt
Each uploaded receipt appears on a review list showing its extracted amount, date, and vendor, plus the suggested category if one was found.
- If the suggestion looks right, confirm it and click Save — this creates a budget entry against that category and reduces its remaining budget for the month.
- If you'd rather use a different category, pick it from the category list before saving.
- If no suggestion was found, or none of your categories fit, pick one manually — a receipt can also be reviewed with no category chosen at all, if you just want to discard it.
- Click the delete icon on a receipt to remove it without logging anything.
A category's remaining-budget figure never blocks a new receipt — once a category's limit is used up, its remaining amount is shown as zero, but you can keep logging further receipts against it for the rest of the month.
Import & Export Free
On all plans, including Free, you can bulk-import and bulk-export your payments list.
To import payments:
- Click Import at the top of the Payments page.
- Upload a CSV, Excel (.xlsx), or ODS file. The file must include a header row, with columns in this order: Contract, Partner, Document, Status, Amount, Currency, Date, Method.
- Review the preview and confirm the import.
If a row's Contract or Partner column matches the name of exactly one existing contract or partner, the imported payment is linked to it automatically — the two are resolved independently, so a payment can end up linked to one, both, or neither. A name that matches none of your records, or more than one, is left unlinked for that row, and a warning lists which rows need fixing by hand afterwards.
To export payments:
- Click Export at the top of the Payments page.
- Choose your preferred format: CSV, Excel, or ODS.
- The file downloads to your device immediately.