Getting Started
This guide walks you through creating your account, setting it up, and taking your first steps in SmoovOps.
Create an account
- Open the SmoovOps website and click Sign up or go directly to the sign-up page.
- Enter your email address and choose a password.
- Select the plan you want to start with. You can always upgrade later from your account settings. If you are not sure yet, start with the Free plan — no credit card is needed. Starter and Pro both come with a 30-day free trial: you won't be charged until the trial ends, and you can cancel any time before then.
- Choose between monthly or annual billing. Annual billing saves up to 20% compared to paying month by month.
- If you have a promo code, enter it in the Promo code field and click Apply. This is optional — you can leave it blank and sign up normally.
- Click Create account to submit your registration.
Confirm your email address
After signing up, SmoovOps sends a confirmation email to the address you provided. Open the email and enter the six-digit code on the confirmation screen to activate your account. If the email does not arrive within a few minutes, check your spam folder.
Your first login
Once your email is confirmed, sign in with your email and password. You will land on the Dashboard, which is your home base in SmoovOps.
Using multiple SmoovOps accounts in one browser
Each SmoovOps login belongs to a single account (for example, your own company, or a client's, if you manage more than one). If you need to be signed in to two different accounts at the same time — say, your own company plus a client you also manage in SmoovOps — don't just open a second tab and log in there: a normal browser window shares one login session across all its tabs, so signing in to the second account will sign you out of the first, or cause the two to interfere with each other.
Instead, keep each account in its own isolated part of the browser:
- Separate browser profiles. Most browsers (Chrome, Edge, Firefox) let you create multiple profiles, each with its own separate login sessions and storage. Create one profile per SmoovOps account and switch between them from your browser's profile menu.
- A private/incognito window for the second account. Sign in to one account in your normal window, then open a private or incognito window and sign in to the other account there. This works for two accounts at once, but isn't ideal for more than two.
- Firefox Multi-Account Containers. If you use Firefox, this extension lets you open a dedicated "container" tab per account, all within the same window.
Any of these keeps the two logins fully separate. This is a browser feature, not a SmoovOps setting — there is no in-app way to switch between accounts within a single browser tab or profile.
Navigating the app
SmoovOps has two main navigation areas:
Top bar — the dark bar at the top of every page. Use it to reach the main sections of the app, access your account, and log out.
Left sidebar — appears on all resource pages when you are logged in. It lists the main modules: Dashboard, Contracts, Documents, Notes, Partners, Payments, Products, Startup Metrics, and Leads. On documentation pages (like the one you are reading now), it shows the documentation table of contents instead.
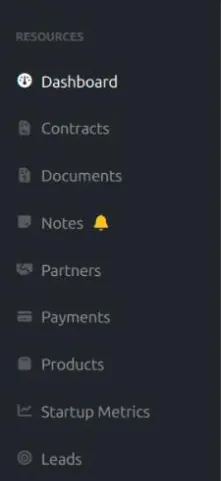
On a phone or narrow screen, the sidebar is hidden by default. Tap the menu icon (☰) at the top left to open it.
Setting up your workspace
Before you start creating contracts, it helps to add your partners first:
Add your partners — go to Partners and add the clients, customers, or vendors you work with. You will be able to select them later when creating contracts and payments.
Once you have partners, creating a contract is quick: pick the partner, set the dates and value, and save. You can also build up a catalogue of your services and goods under Products, for your own reference.
Switching language or theme
You can change the display language and the colour theme at any time:
- Click your name or the user icon in the top bar.
- Choose Settings.
- Switch between English and Deutsch, or between Light, Dark, and System appearance.
The language setting applies to all labels and interface text in the app. For the theme, you can also skip Settings entirely and just click the sun/moon/half-circle icon in the top bar to cycle through the three options directly — see Light and dark mode for details.
Installing SmoovOps on your device
SmoovOps can be installed like an app — it then opens in its own window and from your home screen or app list, and pages you've already opened keep working offline.
- Android, and Chrome or Edge on a computer: click Install app in the top bar, then confirm in the browser's dialog. The button only appears once your browser offers installation; if you don't see it, use the browser menu (⋮) → Install app or Add to Home screen.
- iPhone and iPad: browsers there don't let a website start the installation. Click Install app in the top bar for a reminder, then tap the browser's Share button and choose Add to Home Screen.
Once SmoovOps runs as an installed app, the Install app button no longer appears.