Partners
The Partners module is your central contact book. It stores everyone you work with — clients you sell to, contractors you hire, and suppliers you buy from.
Customers and Vendors
Every entry in the Partners list has a type:
- Customer — someone you sell to, such as a client
- Vendor — someone you buy from or hire, such as a supplier or subcontractor
The type affects how the partner appears in filters and reports, but both types work the same way in all other respects.
Viewing your partners
Go to Partners in the left sidebar to see the full list. Each row shows the partner's name, type, email address, and any tags you have applied. Use the search box at the top of the list to filter by name or tag.

Adding a new partner
- Click Add partner (the button at the top right of the Partners page).
- Fill in the details:
- Name — the person's or company's name (required)
- Type — Customer or Vendor
- Description — optional notes about this contact
- Website — optional link to the partner's website
- VAT ID — optional
- Registration court — optional
- Registration number — optional
- Logo — optional; upload an image and SmoovOps resizes it automatically
- Tags — optional labels to help you group and filter (separate multiple tags with commas)
- Click Save to add the partner.
Addresses aren't part of this initial form — add them afterwards from the partner's detail view (see Managing addresses below).
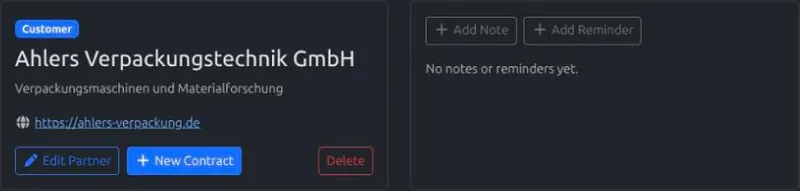
Website and Logo only ever appear on the partner's detail view — never in the Partners list/grid. On the detail view, the website shows as a clickable link, and the logo appears prominently in the right-hand panel. Selecting a note or reminder replaces the logo there with that note's details; click the × in the corner of the note's details (or select nothing) to bring the logo back. Website is included in export/import (see Import & Export below); Logo, being an image file, is not.
Generating partners from files Pro
Instead of filling in the form by hand, you can upload a file — such as an invoice, letter, or contract you received from someone — and let SmoovOps read the sender's details for you. If the file is already a document in SmoovOps, you can start this flow straight from its detail page instead of uploading it again — see Creating a partner from a document.
- Go to Partners in the left sidebar and click + From File(s).
- Above the upload area, check or uncheck Keep document after generation to your liking — see Keeping or discarding the source document below. Your choice is remembered for next time.
- Drag and drop one or more files onto the upload area, or click Choose Files to browse. Any file type is accepted.
- Each file is processed in the background, the same way document uploads are — see Uploading and auto-processing documents for what the Pending/Processing/Processed/Needs Review/Failed statuses mean.
- Once a file is ready, click Generate Partner next to it (or click Generate all to work through every ready file one after another, with Save/Previous/Next controls at the top, just like reviewing documents).
The review screen pre-fills a new partner's Name, Type, VAT ID, and Address from what was found in the file, flagging any field it wasn't fully confident about. VAT ID comes through exact, rather than flagged as a guess, when the source was a ZUGFeRD e-invoice's embedded data — see E-invoices (ZUGFeRD). The Type defaults based on your plan — private accounts default to Vendor, business accounts default to Customer — but you can always change it. If the file's raw address text couldn't be split into Street/Postal Code/City automatically, it's shown for reference so you can fill those fields in yourself.
If SmoovOps recognises the sender as a partner you already have, it shows a suggestion instead: click Use this partner to link to the existing one rather than creating a duplicate, or ignore it and fill in the form to create a new partner anyway.
Generating a partner this way only creates (or links) the Partner — it does not yet create a contract, and the document isn't linked to one. That's a separate step; see Generating contracts from files on the Contracts page.
Keeping or discarding the source document Pro
By default, the file you uploaded to generate a partner stays afterwards as a document, linked to the new (or matched existing) partner, and can be found and further processed from the Documents page.
If you don't need it tracked as a document — for example if you're only using the file to quickly create a partner — uncheck Keep document after generation above the upload area before generating. With it unchecked, the source document and its uploaded file are deleted as soon as the partner has been generated, whether you created a new partner or linked to an existing one. Your choice is saved in your browser and shared with the same checkbox on the Contracts + From File(s) page, since both generate from the same underlying documents.
Removing unwanted uploads Pro
If you uploaded the wrong file, or a document never finished processing, click Remove all next to Generate all on the imported-files list, then Confirm?. This clears every file still on the list — including ones stuck at Pending, Processing, or Failed, not just ones ready to generate a partner — deleting each document and its uploaded file along with it. It never affects a partner you've already generated from a previously-handled file.
Editing a partner
Click the edit icon next to any partner in the list to open the edit form. Change any fields you need and click Save.
Deleting a partner
Open a partner's detail view and click Delete. Before you can confirm, SmoovOps checks what's linked to the partner: its contracts, everything linked to those contracts (pending payments, documents, and notes/reminders), plus any documents and notes attached to the partner directly.
-
If any of the partner's contracts is Active, deletion is blocked outright — a message tells you how many active contracts exist and asks you to cancel or otherwise deactivate them first. No Confirm? option is offered in this case.
-
If nothing is linked, you're simply asked to confirm, same as before.
-
If something is linked (and no contract is Active), a summary shows how many inactive contracts are involved, together with their combined pending payments and notes/reminders, plus how many documents are linked. Choose one:
- Also delete the inactive contracts and their pending payments/notes
- Keep them, just unlink from this partner
Documents are always kept and unlinked either way — deleting a partner never deletes a document. Payments that are already settled (Succeeded or Refunded) are always kept too, regardless of your choice. Confirm? stays disabled until you've picked one of the two options.
Click Confirm? to finish, or Cancel to back out without deleting anything. The partner's addresses are removed automatically along with the partner — they aren't a separate record you need to handle yourself.
Deleting a single contract works the same way, just scoped to that one contract's own payments, documents, and notes — see Deleting a contract.
Grid and List view
Use the toggle above the list to switch between Grid view (a card per partner) and List view (a compact table). Your choice is remembered the next time you visit the page.
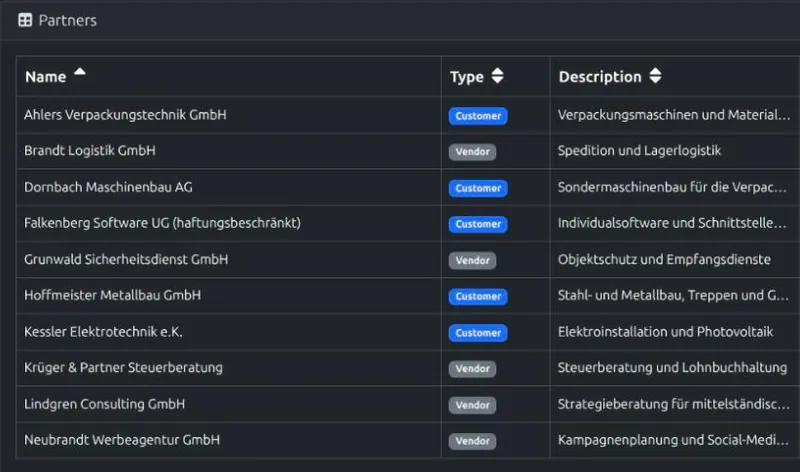
In List view, click a column header to sort by that column; click it again to reverse the order.
Searching and filtering
The search bar at the top of the partners list filters by name in real time as you type. You can also filter by type (Customer / Vendor) using the dropdown next to the search bar.
Using tags to organise partners
Tags are free-form labels you attach to a partner (for example: "priority client", "german market", "subcontractor"). They appear in the partner list and you can filter by them. There is no limit to how many tags you can add per partner.
Managing addresses
Click a partner in the list (or its card, in Grid view) to open its detail view. From there you can add, edit, and remove as many addresses as you need for that partner — for example a main office, a separate billing address, and a shipping address.
Each address has:
- Usage — Main, Billing, Shipping, or Other
- Contact Person — optional
- Email and Phone — optional
- Street, Postal Code, City, and Country
To add an address:
- Open the partner's detail view.
- Under Addresses, click Add Address.
- Fill in the fields you need and click Save.
To edit or remove an address: use the pencil or trash icon next to it in the address list. Removing an address asks you to confirm first.
Notes and reminders
A partner's detail view also has a Notes/Reminders column where you can keep notes and reminders about that partner — for example a preferred delivery window, or a reminder to follow up on a renewal. See the Notes & Reminders page for how notes and reminders work, including the Notes page that lists everything across all your partners, contracts, and payments in one place.
Import & Export Free
On all plans, including Free, you can bulk-import and bulk-export your partner list.
To import partners:
- Click Import at the top of the Partners page.
- Upload a CSV, Excel (.xlsx), or ODS file. The file must include a header row, with columns in this order: Name, Type, Description, Tags, Email, Phone, Street, Postal Code, City, Country, Website.
- Review the preview and confirm the import.
Duplicate partners: if a row's Name matches a partner you already have (not case-sensitive), SmoovOps asks whether to merge the row into that existing partner or create a separate new partner with the same name. Merging overwrites only the fields the row actually contains (Name, Type, Description, Tags, address, Website) and always keeps the existing logo and any contracts, documents, payments, or notes already linked to that partner. If a row includes address details, it replaces the partner's existing address rather than adding to it. If your file has several rows that match existing partners, check Apply to all remaining duplicates to answer once for all of them instead of one at a time.
To export partners:
- Click Export at the top of the Partners page.
- Choose your preferred format: CSV, Excel, or ODS.
- The file downloads to your device immediately.
Export is useful for backups, reporting in a spreadsheet tool, or migrating your data to another system.